
Purpose of Command Line programs
Command-line applications, or CLIs, can be a convenient and powerful way to perform simple tasks quickly and efficiently. Some reasons why it might be interesting to develop a command-line application include:
- CLIs can be faster to use than graphical user interface (GUI) applications, as the user does not need to navigate through menus or click on buttons.
- CLIs can be run from the command prompt or terminal, which allows for easy integration with other command-line tools and scripts.
- CLIs can be automated using scripts, allowing for the automation of repetitive tasks.
- CLIs can be run on a remote server or device through secure shell (SSH) access, which can be useful for performing tasks remotely.
- CLIs can be more lightweight and efficient than GUI applications, as they do not need to render a graphical interface.
The System.CommandLine library
The System.CommandLine library is a .NET library for defining command-line interfaces and parsing command-line arguments. It provides a simple and flexible API for building command-line applications, and supports a wide range of features including options, arguments, subcommands, and more.
The System.CommandLine library is built on top of the System.CommandLine.Parsing library, which provides the underlying infrastructure for parsing command-line arguments. Together, these two libraries provide a complete solution for building command-line applications in .NET.
Here are some key features of the System.CommandLine library:
- Simple and flexible API for defining command-line interfaces
- Support for options (flags) and arguments
- Support for subcommands and command hierarchies
- Support for parsing a wide range of argument types (including integers, floating-point numbers, dates, and more)
- Support for custom argument parsing and validation
- Support for generating usage help and error messages
If you are building a command-line application in .NET and want a simple and flexible way to define and parse command-line arguments, the System.CommandLine library is worth considering.
Code line by line
It’s needed to install two external packages that are available in the NuGet package Manager. These are the versions I’ve used:
<PackageReference Include="Spectre.Console" Version="0.45.0" />
<PackageReference Include="System.CommandLine" Version="2.0.0-beta4.22272.1" />
Here is a line-by-line breakdown of the code:
using System.CommandLine;
using Spectre.Console;
These lines import the necessary namespaces for the code. System.CommandLine provides types for defining command-line interfaces and parsing command-line arguments, while Spectre.Console provides types for writing to the console.
// Options
var delayOption = new Option<int>
    (name: "--delay",
    description: "An option whose argument is parsed as an int.",
    getDefaultValue: () => 50);
var messageOption = new Option<string>
    ("--message", "An option whose argument is parsed as a string.")
{ IsRequired = true };
These lines define two options for the CLI. An option is a flag that the user can specify when running the CLI, followed by an additional value.
The delayOption is an option that takes an integer value. Its name is “–delay” and it has a description. Its default value is 50.
The messageOption is an option that takes a string value. Its name is “–message” and it has a description. This option is required, meaning that the user must specify it when running the CLI.
// Arguments
var nameArgument = new Argument<string>
    ("name", "An argument that is parsed as a string.");
This line defines an argument for the CLI. An argument is a value that the user must specify when running the CLI.
The nameArgument is an argument that takes a string value. Its name is “name” and it has a description.
var rootCommand = new RootCommand("Sample command-line app");This line defines the rootCommand variable as the root command of the CLI, with the name “Sample command-line app”.
// To define a global option (for commands and subcommands recursively)
rootCommand.AddGlobalOption(delayOption);
This line adds the delayOption as a global option for the rootCommand. A global option is available for use in the root command and any subcommands.
// To add options or arguments to a command
rootCommand.Add(messageOption);
rootCommand.Add(nameArgument);
These lines add the messageOption and nameArgument to the rootCommand.
rootCommand.SetHandler(RootCommandHandler, delayOption, messageOption, nameArgument);This line sets the handler for the rootCommand using the SetHandler method. The RootCommandHandler method is defined later in the code and is passed the values of the delayOption, messageOption, and nameArgument as arguments.
void RootCommandHandler(int delayOptionValue, string messageOptionValue, string nameArgumentValue)
{
    AnsiConsole.Status().Spinner(Spinner.Known.Dots2).Start("Doing some work...", (ctx) =>
    {
        Thread.Sleep(3000);

        AnsiConsole.MarkupLine("Hello from command");

        var table = new Table();

        // Add some columns
        table.AddColumn("Type");
        table.AddColumn("Name");
        table.AddColumn(new TableColumn("Value").Centered());

        // Add some rows
        table.AddRow("option", "--delay", $"{delayOptionValue}");
        table.AddRow("option", "--message", $"{messageOptionValue}");
        table.AddRow("argument", "<name>", $"{nameArgumentValue}");

        // Render the table to the console
        AnsiConsole.Write(table);

        Thread.Sleep(4000);
    });
}
The RootCommandHandler method displays a spinner on the console and then writes “Hello from command” to the console. It then creates a table and adds three columns to the table. It adds three rows to the table, using the values of the delayOption, messageOption, and nameArgument as the values for the rows. Finally, it writes the table to the console.
// Define a first level subcommand
var subCommand = new Command("sub-command", "First-level subcommand");
subCommand.SetHandler((delayOptionValue) => {
    AnsiConsole.MarkupLine("Hello from subcommand");
    AnsiConsole.MarkupLine($"--delay = {delayOptionValue}");
}, delayOption);
rootCommand.Add(subCommand);
These lines define a first-level subcommand of the root command, with the name “sub-command” and a description. A handler is set for the subCommand using the SetHandler method, which takes the delayOption as an argument. The subCommand is then added to the rootCommand.
// Define a second level subcommand
var sub1aCommand = new Command("sub1a", "Second level subcommand");
subCommand.Add(sub1aCommand);
These lines define a second-level subcommand of the subCommand, with the name “sub1a” and a description.
await rootCommand.InvokeAsync(args);This line causes the CLI to start and process the specified command and arguments. The InvokeAsync method is called on the rootCommand with the args array as an argument.
Execute the Console application
There are multiple ways to run this application. Let’s see a couple of them.
Run application in the console
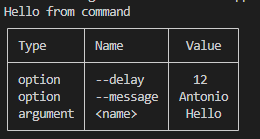
Let’s execute one of these three commands and check the result
dotnet run "Hello" --delay=12 --message="Antonio"
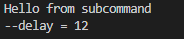
dotnet run sub-command --delay 12
dotnet run sub-command sub1a --delay 12 The results in the console will be the followings
While after running the third command the console will be empty because the related handler does not perform any actions.
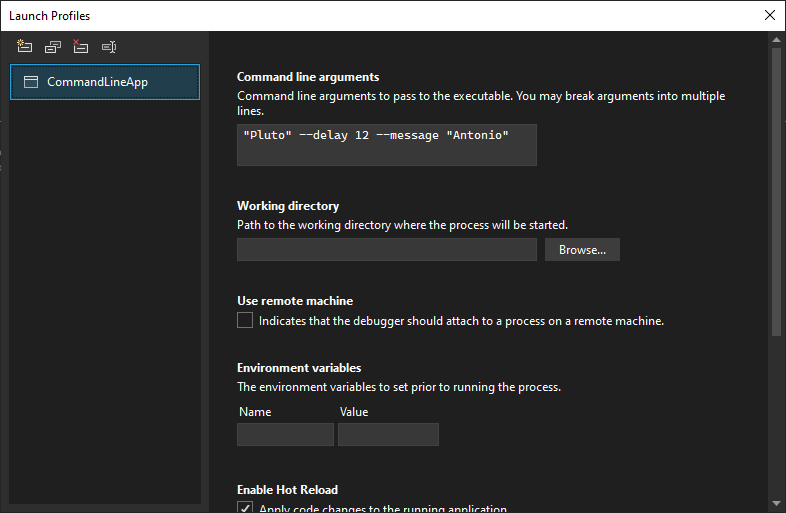
Run in the Visual
- Right-click on the project in Visual Studio
- Select Properties
- Click on “Debug”
- “Open debug launch profiles UI”
- Define command line arguments
As an example
Then you can simply execute the program through Visual Studio and it will execute the app passing the specified arguments or options.
References
- Microsoft page: https://learn.microsoft.com/en-us/dotnet/standard/commandline/
- GitHub library code: https://github.com/dotnet/command-line-api
- GitHub example code: https://github.com/antonespo/CommandLineApp