
Azure Functions and Azure Storage Account are two of the most popular services offered by Microsoft Azure. Azure Functions is a serverless computing service that allows you to run event-driven code without having to manage any infrastructure. On the other hand, Azure Storage Account is a cloud-based storage solution that offers a wide range of features, including blobs, files, queues, tables, and disks.
When working with Azure Functions and Azure Storage Account, it is common to need to authenticate the function to the storage account. This can be done using either a managed identity or an application service principal. In this article, we will discuss how to authenticate Azure Functions to Azure Storage Account using managed identity or application service principal.
Managed Identity
Managed identities are a feature of Azure Active Directory that allows you to create an identity for your function app in Azure. Once you have created a managed identity, you can use it to authenticate your function app to other Azure resources, including Azure Storage Account.
To authenticate Azure Functions to Azure Storage Account using a managed identity, follow these steps:
- Create a managed identity for your function app. To do this, go to the Azure portal and navigate to your function app. Under the “Identity” section, click on “System assigned” and then switch the “Status” toggle to “On”.

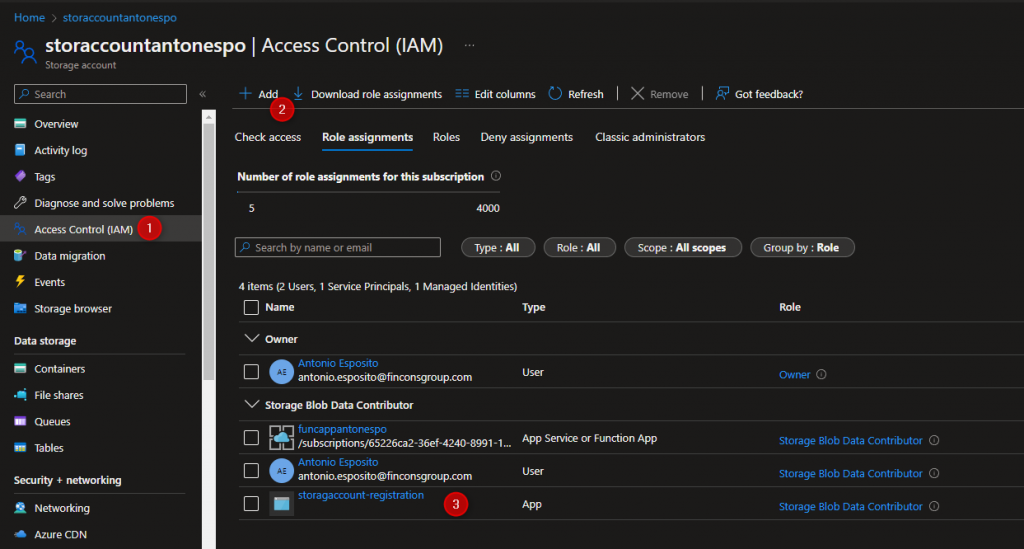
- Grant the managed identity access to your storage account. To do this, go to the Azure portal and navigate to your storage account. Under the “Access control (IAM)” section, click on “Add” and then select “Add role assignment”. In the “Role” dropdown, select “Storage Blob Data Contributor” or another appropriate role. In the “Select” dropdown, select your function app’s managed identity.

- Create your function app code to use the managed identity to authenticate to your storage account. To do this, use the Azure.Identity NuGet package to interact with your storage account.
- The function is defined with the [FunctionName] attribute, which specifies the name of the function (“ManagedIdentityStorageAccountFunction”). It also includes an [HttpTrigger] attribute, which specifies that the function can be invoked by an HTTP request with an anonymous authorization level (i.e. no authentication required).
- The function takes two parameters: an HttpRequest object, which represents the incoming HTTP request, and a ILogger object, which can be used for logging messages.
- Inside the function, a new instance of the BlobServiceClient class is created, passing in the URI of the storage account and a DefaultAzureCredential object. The DefaultAzureCredential object is responsible for automatically authenticating the function app to the storage account using its managed identity.
- The GetFirstBlobItem method is called, passing in the BlobServiceClient object. This method retrieves the first blob in a specified container and returns a BlobItem object.
- The function then returns an OkObjectResult, passing in the name of the retrieved BlobItem object.
namespace ManagedIdentity;

public static class StorageAccountFunction
{
    public static string accountName = "storaccountantonespo";
    public static string containerName = "data";

    [FunctionName("ManagedIdentityStorageAccountFunction")]
    public static IActionResult RunManagedIdentityStorageAccountFunction(
        [HttpTrigger(AuthorizationLevel.Anonymous, "get", Route = null)] HttpRequest req,
        ILogger log)
    {
        var blobServiceClient = new BlobServiceClient(
            new Uri($"https://{accountName}.blob.core.windows.net"),
            new DefaultAzureCredential());

        var blobItem = GetFirstBlobItem(blobServiceClient);

        return new OkObjectResult(blobItem.Name);
    }

    private static BlobItem GetFirstBlobItem(BlobServiceClient blobServiceClient)
    {
        var blobContainerClient = blobServiceClient.GetBlobContainerClient(containerName);
        var blobItem = blobContainerClient.GetBlobs().ToList().FirstOrDefault();
        return blobItem;
    }
}
One of the key advantages of using a managed identity to authenticate an Azure Function to an Azure Storage Account is that you do not need to include any credentials, such as a connection string or access key, in your function code. This is because the managed identity allows the function app to authenticate itself to the storage account automatically, without requiring any explicit credentials to be passed in the code.
When you create a managed identity for your Azure Function, it is assigned an Azure Active Directory (Azure AD) identity, which is used to authenticate the function app to other Azure resources, such as the Azure Storage Account. This identity is then automatically included in the authentication flow when you use the Azure SDKs or APIs to access the storage account.
Additional information could be found at the link of the Microsoft documentation.
Application Service Principal
An application service principal is a security principal in Azure Active Directory that represents an application. It can be used to authenticate your function app to other Azure resources, including Azure Storage Account.
To authenticate Azure Functions to Azure Storage Account using an application service principal, follow these steps:
- Create an application service principal for your function app. To do this, go to the Azure portal and navigate to Azure Active Directory. Under the “App registrations” section, click on “New registration”.
- Save the tenant id and client id that is automatically assigned.

- Grant the application service principal access to your storage account. To do this, go to the Azure portal and navigate to your storage account. Under the “Access control (IAM)” section, click on “Add” and then select “Add role assignment”. In the “Role” dropdown, select “Storage Blob Data Contributor” or another appropriate role. In the “Select” dropdown, select your application service principal.
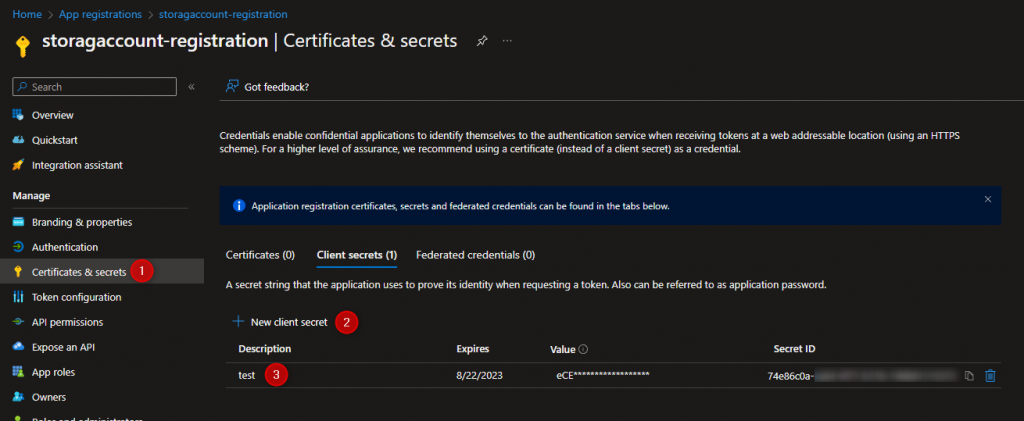
- Create a client secret for your application service principal. To do this, go to the Azure portal and navigate to your application service principal. Under the “Certificates & secrets” section, click on “New client secret”. Give your secret a description and an expiration date, and then click on “Add”. Save the secret value that is displayed.
- Configure environment variables for application.
- When working locally with Visual Studio, environment variables can be set in the
launchsettings.jsonfile in thePropertiesfolder of your project. When the app starts up, these values will be pulled in automatically. - When deployed to Azure environment variables can be set in the Azure Function Configuration
- When working locally with Visual Studio, environment variables can be set in the
{
  "profiles": {
    "_59_ManagedIdentity": {
      "commandName": "Project",
      "commandLineArgs": "--port 7105",
      "environmentVariables": {
        "AZURE_CLIENT_ID": "<client-id>",
        "AZURE_TENANT_ID": "<tenant-id>",
        "AZURE_CLIENT_SECRET": "<client-secret>"
      }
    }
  }
}
DefaultAzureCredentialsupports multiple authentication methods and determines the authentication method being used at runtime. In this way, your app can use different authentication methods in different environments without implementing environment-specific code. When deployed to Azure this same code can also authenticate your app to other Azure resources.DefaultAzureCredentialcan retrieve environment settings and managed identity configurations to authenticate to other services automatically. The order and locations in whichDefaultAzureCredentiallooks for credentials is found at DefaultAzureCredential. The above-mentioned code for the service principal authentication remains untouched!
Additional information could be found at the link of the Microsoft documentation.
Testing the Azure Function in the Azure Portal
Let’s now test the implementation. First of all we should deploy the Azure Function and then decide which authentication method we would like to use. So let’s enable first Managed Identity and then let’s set the Azure Function environment variables to grant access to the storage account.
Testing an Azure Function with an HTTP trigger in the Azure portal is a straightforward process. Here are the steps to do so:
- Open the Azure portal and navigate to your Azure Function app.
- Click on “Functions” in the left-hand menu to view a list of all functions in the app.
- Locate the function and click on it.
- Click on the “Code + Test” tab in the function editor window to view the testing tools.
- In the testing tools, you can specify the HTTP method, query parameters, and request body for the function request. You can also set headers and other options as needed.

The response displayed in the testing tools represents the first blob element name in the storage account. Well-done!